Now for a job I've not been particularly looking forward to... levelling the dining room floor.
First, I needed to flatten off the high points of the existing concrete screed where it protruded above the timber floor of the living room.
Using chalk, I marked out the high points.
Using the angle grinder creates masses of dust and grit very quickly so, given that this part of the floor borders the "furnished" living room, I had to devise a method of containing as much as possible. For this I used an old 10 litre emulsion tub, cutting holes for the angle grinder body and vacuum cleaner hose.
It wasn't perfect, but it prevented about 90% of the dust from getting out into the room.
I then drove a number of screws into the floor in a grid pattern.
With the edge of the living room floor as my starting point and reference, I adjusted the height of each screw whist using the 6ft spirit level to ensure that each one was level with the next. So now, the screw heads represented what would become the surface of the new floor.
With the spirit level rested on adjacent screws, I could then measure the gaps at strategic points. In some places, this was over an inch!
...and then these measurements were mapped into an Excel spreadsheet and the remaining values interpolated. Once colour coding was added (green = small gap, red = large gap), the contours were clearly visible and it was possible to estimate the amount of self-levelling compound required.
Just the 300kg (15 bags) of self-levelling compound required then!!!
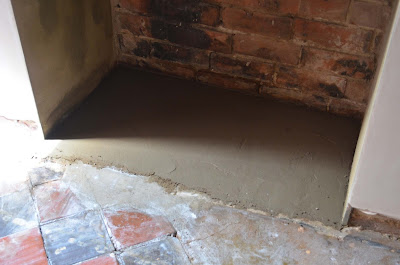
Before applying this, I needed to raise the level of the floor inside the fireplace using conventional concrete, topped with a mortar screed. This would save having to use the more expensive levelling compound for such a deep area.
First a dilute PVA solution was applied as a primer.
Then the concrete and mortar screed applied. No need to make it too neat as it will be covered with self-levelling compound.
Lifting a loose tile or two revealed nothing more than a bed of sand beneath. Not sure if this is how it was originally laid or if it used to be on mortar that has "washed out" over the years.
I dug out the loose stuff, rammed down a handful of gravel then back-filled with cement before refitting the tile.
Now the entire floor could be primed using a 4:1 dilution of PVA adhesive.
Once the PVA had dried, and using the screws and my map as a guide, I poured a thin screed of self levelling compound into the deepest areas first.
This particular compound (Setcrete Universal) is only intended to be poured to a maximum of 6mm so the floor would be built up using several successive pours, each layer being allowed to dry in between. Dilute PVA primer was also applied to each layer.
Although it is "self levelling", the compound benefits from a little direction so I treated myself to this 400mm floor trowel.
After pouring the third layer, the floor was reasonably level although the mixture of screed and old tiles doesn't look too pretty. At this stage, the screws could be extracted as the final screed would be a fairly even thickness and could be judged by eye.
The remaining six bags of compound were made up in quick succession by my willing helper, allowing me to pour and trowel a fairly continuous final screed over the entire surface. Three hours later, it was set and good to walk on.
Now to the door step into the kitchen... For this, I selected a piece of 18mm Richard Burbidge Pineboard. This is engineered timber so should be more stable than regular timber, particularly as I will be routing a significant rebate into the underside. At 850mm, it's just wide enough for the doorway.
I began by cutting the board to length and shaping each end to fit around the door frame profile.
Then I needed to rebate the underside so that the step sits at the correct level for the door threshold (about 8mm). Just a small section at the front of the step would remain full height.
Most of the material was removed by routing a series of 10mm deep channels.
Then the power plane took the remainder off to a level surface.
With the step in situ, the aluminium threshold strip could be cut to length and the floor drilled in readiness for fixing.


No comments:
Post a Comment