I think the frame now consists of more plastic than a modern uPVC unit but at least it won't rot.
...and with a coat of primer, it's starting to blend in.
...finally a gloss coat and it's as good as new... shame about the state of the door!! That's a job for another day.
...and no longer any evidence of where the old fuse box was...
On Friday, the flat roof over the bathroom was re-felted courtesy of DSH roofing. The old covering was badly cracked along the bottom edge and rain water had penetrated to the timber deck. Fortunately, this is made from ply so had survived pretty well.
The old felt covering was well stuck down so proved a bit of a challenge to remove.
The new covering consists of 3 layers, finished with a mineral felt.
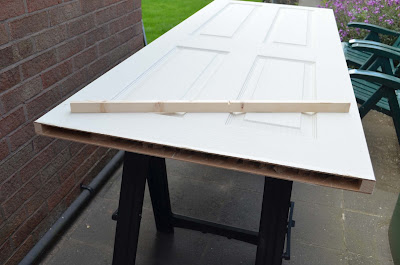
Next up, a couple of the internal doors... The new door for the bathroom was a good 2 inches too long but, because it's a hollow moulded door, the manufacturer recommends taking no more than 5mm off either end so as not to weaken the frame too much. No matter, I took off the entire 2" excess with a power saw and, as expected, this included the entire bottom frame, exposing the internal cardboard honeycomb structure. I carefully planed the offcut timber to re-fit in the resulting aperture at the bottom of the door.
This was coated with PVA adhesive and pushed back into position before being clamped until set.
...and then finished off with a light planing, using the new toy of course!
The hinges and latches were set into the frames and doors using the router, finished off with a sharp chisel. To maintain a fairly contemporary theme in the back end of the house, both the bathroom and lobby doors have chrome, ballraced hinges and chrome handles.
Prompted by the delivery of the new bath on Friday, the bathroom renovation got under way this weekend. I must say I was very impressed with Trading Depot - I ordered the bath on Thursday morning and it arrived the very next day! It was by far the cheapest price and included the set of legs (which many suppliers charge an extra £25 for) and only £5 for delivery! It's enamelled steel and from the Kaldewei Eurowa range.
This phase is going to be a bit tricky as the bathroom contains the only "facilities" in the house. We sat down and planned this bit in some detail so as to minimise down-time, particularly of the loo!
A quick reminder of how it's been up till now...
I knocked out the old plaster air vent as this is where the new fan will go. The new cabling is already in place for this.
With the tiles removed from the window sill, there was a bit of damage to the rendered surface. The beading was also pretty rusty so I treated it with a coat of Kurust to stop the rot and turn it back into metal.
...and the surface re-rendered with fresh mortar.
Meanwhile, Jacqui has continued to paint the pantry window frame. The outer frame has now been glossed and the internal frame has had a second coat of the Dove Grey eggshell.


No comments:
Post a Comment