So, this week I was back to the day job - for a rest. Work has focussed mainly on bedroom 3 again this week. I've sanded the plaster skim below the door step flush with the timber batten.

The new MDF step was then eased into position and secured with screws.


Although the room is a simple rectangular shape, the position of the radiator proved a challenge when installing the skirting boards. Both radiator pipes are very close to the walls so the skirtings have had to be cut and joined behind them. Mitring the joints at 45 degrees provides a neater join. In the corner, I fitted a small piece of skirting which I mitred to fit close behind the pipe. This was fixed to the wall using grab adhesive.

I then cut the remaining length of skirting with a corresponding 45 degree mitre. I used the jigsaw to cut away the bit where the pipe goes, having first established the correct profile by test cutting a scrap off-cut of skirting.

The mitre provides a neat joint and the contour is a snug fit on the pipe. The main lengths were fixed using both screws and grab adhesive.


Whilst the room was still reasonably clear, I took the opportunity to paint the ceiling. For the mist coat, I used the Screwfix No-Nonsense Bare Plaster emulsion.

Before starting on the walls, I rubbed down the window frame in preparation for painting. This window has never been a great fit and is quite draughty. The bottom sash was about 6mm away from the beading and rattled in the wind. Also, the bottom edge of the frame was quite curved so only made contact with the sill at the centre, leaving a large gap at either end. I figured that this would be a good time to learn a bit about sash window construction, so I set about dismantling it.

First, I carefully levered away the staff bead. As this was nailed and mitred at the corners, it wasn't easy to extract. I had to tease out the nails at either end using snipe nose pliers. Then, springing it away at the centre, just enough for the protruding nails to clear the frame, I could slide out the beading.


To ensure that the counter-weights didn't pull the sash cords right into the casing, the cords were temporarily re-knotted at the ends.


I ripped it down to roughly the right thickness using the power saw, then finished off the surface with the power plane. Both ends had to be rebated to fit the pocket and the cover had to be trimmed to exactly the right length for a good fit.

The top edge has two opposing chamfers. The rear is angled downwards for easy entry and the front angles upwards to hook into position at the top of the pocket...

...and the bottom edges are lightly chamfered to match the edge of the pocket.

Fits quite nicely, so now just needs a hole drilling for the securing screw and a couple of coats of paint.


For this, I used the power plane, taking several millimetres of at the centre and feathering out at either end. I had to maintain a slight angle on this rail as it needs to match the angle of the sill.


On each of the rails (not just on this window, but all of our sash windows) there is evidence that there was once a central muntin bar, so each sash would originally have consisted of two panes of glass.

Historically, smaller panes of glass were easier (and therefore cheaper) to produce. Throughout the nineteenth century however, as glass technology improved and the cost of glass came down, many sash windows had the muntins removed in favour of the larger panes of glass.
Unfortunately, the ends of the muntins are still set into the frames and, where paint has worn away, the end grain has acted like a sponge and soaked up rain water over the years.
I've drilled and chiselled out a few millimetres of the muntin from the bottom rail and back-filled it with 2 part filler. Hopefully this will prevent further water ingress. The exposed timber has been primed and, once dry, I undercoated the sash and finished off with a top coat of oil based satinwood.

Meanwhile, the open window was boarded up with a sheet of 3/8" ply, covered on the outside with polythene sheeting.


The strips were then attached to the edges of the architrave using panel pins. and the edges sealed with decorators caulk.


First job is to mark on the position of the lock block. Because it's a hollow door, the manufacturers install a block of chipboard part way down one edge so there is something solid to fit the handle and latch to. This is printed on the top edge of the door, but as soon as you start trimming the door, this disappears so experience has taught me to make a note!

Having offered the door up to the frame, I figured about 15mm needed to come off the height. Because the internal frame timber is reasonably thin, it's advisable to take equal amounts off either end so as not to weaken the door too much. A 7mm strip was ripped off either end...

...then the ends and sides were planed until a neat fit was achieved with the frame.

To set in the hinges, I opted for the traditional method of chiselling them out rather than using the router.


With the hinges fitted, I hung the door for a test fit.


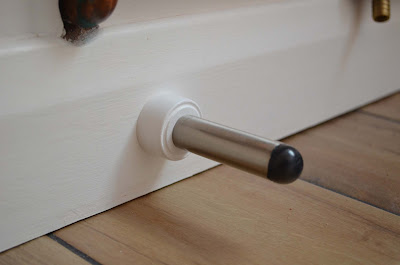
Elsewhere, with lots of paint and fillers waiting to dry, I got round to fitting a proper door stop in the lobby to prevent the back door from hitting the new radiator. The stop wasn't quite long enough, so I used a hole saw to cut a small disc out an off-cut of MDF skirting. A slightly smaller hole saw was used to add a "decorative" groove on the surface. All that remained was a coat or two of paint, then I screwed it to the skirting beneath the radiator.


...so, if you're ever asked the question "how do you make a Roman blind"... now you know!!

The new MDF step was then eased into position and secured with screws.

I covered the screw heads with 2-part wood filler and sanded to a smooth finish.

And finally, a coat of MDF primer followed by a topcoat of quick-dry satinwood finishes off the step nicely.

Although the room is a simple rectangular shape, the position of the radiator proved a challenge when installing the skirting boards. Both radiator pipes are very close to the walls so the skirtings have had to be cut and joined behind them. Mitring the joints at 45 degrees provides a neater join. In the corner, I fitted a small piece of skirting which I mitred to fit close behind the pipe. This was fixed to the wall using grab adhesive.

I then cut the remaining length of skirting with a corresponding 45 degree mitre. I used the jigsaw to cut away the bit where the pipe goes, having first established the correct profile by test cutting a scrap off-cut of skirting.

The mitre provides a neat joint and the contour is a snug fit on the pipe. The main lengths were fixed using both screws and grab adhesive.

The remaining skirtings were relatively straightforward to fit. The screw heads have been covered with 2 part wood filler, sanded, then primed before top-coating with quick-dry satinwood.

Whilst the room was still reasonably clear, I took the opportunity to paint the ceiling. For the mist coat, I used the Screwfix No-Nonsense Bare Plaster emulsion.

Before starting on the walls, I rubbed down the window frame in preparation for painting. This window has never been a great fit and is quite draughty. The bottom sash was about 6mm away from the beading and rattled in the wind. Also, the bottom edge of the frame was quite curved so only made contact with the sill at the centre, leaving a large gap at either end. I figured that this would be a good time to learn a bit about sash window construction, so I set about dismantling it.

First, I carefully levered away the staff bead. As this was nailed and mitred at the corners, it wasn't easy to extract. I had to tease out the nails at either end using snipe nose pliers. Then, springing it away at the centre, just enough for the protruding nails to clear the frame, I could slide out the beading.

The remaining staff beads were easier to remove once the first one was out.

With the side and bottom staff beads removed, the lower sash was free to swing out of the frame, still attached by the sash cords at the top.

The sash cords slot into a channel at the top of each stile and are retained by a simple knot set into a recess lower down. The knots were undone and extracted from the sash.

To ensure that the counter-weights didn't pull the sash cords right into the casing, the cords were temporarily re-knotted at the ends.

I wanted to check the condition of the sash cord where it attaches to the counterweights so, with the lower sash out of the way, I was able to set about removing the pocket cover. These are strips of timber set into the channels on either side, each secured with a single screw at the bottom. Removal should have been fairly simple apart from the build-up of paint that had been applied over many years. I ran a sharp knife blade around the edges several times to break the paint seal, cleaned out the screw head and removed it. Despite lots of levering with a chisel, the strip wouldn't shift. It was free to move up and down, but just wouldn't come out. With all the levering and the fact that it was very old timber, it soon started to split and splinter so I bit the bullet and used brute force to extract it. Eventually it split into two pieces. It turned out that for some reason, it had been wedged in slightly behind the parting bead which was what was stopping it from coming out.

With the weight pocket now open, I was able to inspect the weight and cord. Fortunately, all looked good so there was no need to replace the cords.

Of course, I now had to make a new weight pocket cover. A quick rummage through the shed turned up an off-cut of PSE timber which was just about the right size.

I ripped it down to roughly the right thickness using the power saw, then finished off the surface with the power plane. Both ends had to be rebated to fit the pocket and the cover had to be trimmed to exactly the right length for a good fit.

The top edge has two opposing chamfers. The rear is angled downwards for easy entry and the front angles upwards to hook into position at the top of the pocket...

...and the bottom edges are lightly chamfered to match the edge of the pocket.

Fits quite nicely, so now just needs a hole drilling for the securing screw and a couple of coats of paint.

So, back to the lower sash which I removed earlier. The priority with this was to straighten and clean the bottom rail.

For this, I used the power plane, taking several millimetres of at the centre and feathering out at either end. I had to maintain a slight angle on this rail as it needs to match the angle of the sill.

One end of the bottom rail had suffered some water ingress and the timber was a bit spongy so, after drilling a few pin-holes, I applied some wood hardener to strengthen it, then added a layer of 2 part wood filler before sanding to a smooth finish.

On each of the rails (not just on this window, but all of our sash windows) there is evidence that there was once a central muntin bar, so each sash would originally have consisted of two panes of glass.

Historically, smaller panes of glass were easier (and therefore cheaper) to produce. Throughout the nineteenth century however, as glass technology improved and the cost of glass came down, many sash windows had the muntins removed in favour of the larger panes of glass.
Unfortunately, the ends of the muntins are still set into the frames and, where paint has worn away, the end grain has acted like a sponge and soaked up rain water over the years.
I've drilled and chiselled out a few millimetres of the muntin from the bottom rail and back-filled it with 2 part filler. Hopefully this will prevent further water ingress. The exposed timber has been primed and, once dry, I undercoated the sash and finished off with a top coat of oil based satinwood.

Meanwhile, the open window was boarded up with a sheet of 3/8" ply, covered on the outside with polythene sheeting.

Once the paint was fully dry, I was able to re-fit the lower sash and continue to prepare the frame for painting.
When this room was plastered, you may recall that we had it fitted out with thermal boards (polystyrene backed plasterboard) and due to the thickness of these boards, the plaster skim ended up flush with the window architrave. When painted up, this would look rather odd, so I bought some strips of Richard Burbidge 18mm x 4mm 'D' section moulding to build out the architrave.

These were cut square at the bottom ends and mitred at 45 degrees at the top corners.

The strips were then attached to the edges of the architrave using panel pins. and the edges sealed with decorators caulk.

With the paint on the window frame drying, I made a start on the new bedroom door. Like the others, this is a Premdor textured 4 panel moulded door.

First job is to mark on the position of the lock block. Because it's a hollow door, the manufacturers install a block of chipboard part way down one edge so there is something solid to fit the handle and latch to. This is printed on the top edge of the door, but as soon as you start trimming the door, this disappears so experience has taught me to make a note!

Having offered the door up to the frame, I figured about 15mm needed to come off the height. Because the internal frame timber is reasonably thin, it's advisable to take equal amounts off either end so as not to weaken the door too much. A 7mm strip was ripped off either end...

...then the ends and sides were planed until a neat fit was achieved with the frame.

To set in the hinges, I opted for the traditional method of chiselling them out rather than using the router.


With the hinges fitted, I hung the door for a test fit.

Just a little further trimming with the plane was needed to clear the frame.


Jacqui finished making the Roman blind for the bathroom last week so I fitted the mechanism to the architrave above the window. This wasn't straightforward as the profile of the architrave was causing the clips to angle down slightly rather than pointing out horizontally. I therefore had to make three small wedges which were glued to the architrave and painted before re-fitting the clips.

It was then just a case of threading the mechanism up to the blind which attaches using a velcro strip and fitting it to the clips... blinding!!!

...so, if you're ever asked the question "how do you make a Roman blind"... now you know!!
No comments:
Post a Comment